December 31, 2012

Pillows and Books


I would have never gotten into this whole blogging thing if not for a renewal of an old friendship. Since retirement I have the luxury of spending time again with friends who, like me, had little time to nurture and cherish the people we really like to be around.  Tess and I can't even remember exactly how we met. It was in the 1970's and we both lived in the tiny village where I still reside. But, it was a great match because we both love to talk and she is an incredibly good writer and I enjoy reading anything she writes.
When we rekindled the friendship I learned she had a blog. You can DO that? I went to hers (Books,Art, Life and a Cat) and started reading. all the way from the first to the last posting. As a former school librarian, I was always a book fan, but this was something I knew nothing about. Rare and antiquarian books are her field and she has built a great little business. Her website is Garrison House Books.

Pillow given to Tess with her logo

If you have clicked on the last link you will see her logo. The image of a young Jane Austen era young woman in a red velvet chair who has been disturbed from her reading by SOMETHING! Not very long ago I discovered this same timid female on THE GRAPHICS FAIRY (HERE)
The image worked out very well on an Osnaburg fabric pillow with a wide flange border, don't you think?
With an urge to try to buy locally or make as many gifts as possible, we set up a trade. She got a pillow I had done for a friend and I got a book. We had a rather silly exchange on facebook where the message read. "You bring the pillows and I'll bring the books". Sounds like a literary pajama party.
The pillow traded for a book

The book is THE SEWING BOOK by Ann Jessup from 1913 and the young girls have been so charming that I asked Karen, THE GRAPHICS FAIRY if she would like them.  She loved them and I have sent her all six and she has already posted one HERE.

The book traded for a pillow
 

December 22, 2012

Merry Christmas

No real blog this week.
I'm just posting some pictures of some
of the ornaments on our little tree.
The spool garland was a gift. Love it!


Beaded star from Santa Fe, NM

That little thing on the left is from a sweet gum tree to which I added
 white glitter and a raffia tie

December 16, 2012

Creative Need

When I first retired I thought I should paint. After all, I had earned my undergrad degree in art education. But, painting was not my forte then and years of admiring other's work has not somehow caused me to be any more skillful with the brush.  So I started using the canvas as a framework for textiles and three-dimensional objects in collages. One of the first things I did is HERE . I didn't use a canvas for that one.


Graphics Fairy bird and butterfly
Then I began stretching the fabric over stretcher frames which you can buy in various sizes and put together yourself in a variety of dimensions.

This one required a lot of hand stitching which I really like to do. A bit of fabric glue was also involved.
I have managed to aquire a number of old vintage lace and embroidered hankies and this is another way to use fabric samples like I used in some pillows.


The dancing children from THE GRAPHICS FAIRY inspired this one.
The most difficult challenge here was to find a way to curve the lettering just right and then reverse the image so I could use the Leslie Riley TAP paper and iron it on. AND, I even changed the color of the image to green using a laborious process in paint.net before I discovered befunky.com.


This next one is because I love France and THE GRAPHICS FAIRY has so many great images reflecting the ambience.     

                               
The perfume bottle is from the GRAPHICS FAIRY but I changed the colors. The label and the butterfly are from her, too. The lovely lady in the boudoir is from BUMBLE BUTTON.     
I thought you might like to see how the back is finished off by stapling a muslin covering to the stretcher frame and hiding all the exposed fabric edges and adding the hanging wire.
                      
You can see more at my Etsy shop.


December 9, 2012

Inspiration from the Next Generation

I started this blog with the inspiration from my grandmothers and mother who had all been needlewomen in various ways. Now I am inspired by my daughter who is NOT so handy with needle and thread but is equally creative.  A couple of years ago she made us all charming little paintings on teeny little canvasses and strung them together to make these.

Unfortunately, I only have this one to show you and I should have straightened it up before the photo. With limited supplies on hand she strung it together with black yarn which I should trade out for ribbon...someday.


What appears to be printed fabrics on these is done with a transfer technique so they look as if they are painted on. She then painted on top of that.
I really like the format and the little canvasses are cheap and easy to find. But, being more skilled at working with fabric I made my own versions with fabrics and the help of THE GRAPHICS FAIRY.

The canvasses in this one measure 2 1/2 x 3 1/2 inches each. I love the little seamstress on the top.  I added a real vintage button for more texture.


Now something for the nursery or little girl's room:


These both use a nice unbleached muslin as a background and only the
teddy bear and the baby shoes are not from THE GRAPHICS FAIRY. They are from GRAPHIQUE on Etsy.
 
Speaking of Etsy, you can see more on my shop at


December 2, 2012

Supporting the Habit


When I had the craft show fail, I said I was thinking about setting up an Etsy shop. Well, I did it this past week! I love the process. It is sooo easy to do and not a big expense to set up your own business (plug, plug). And as another plug HERE is the link to my Etsy shop.

 The business and moneymaking aspects were not what spurred me to do this, but rather a way to support my habit. Creating is my habit and fabric and thread is my drug of choice.  I am happiest messing around in this mess of a sewing/computer room and I need to be surrounded by fabric. I cannot resist the lure of textiles!

I went into Joann Fabrics the other day to get buttons or maybe even just one large button and left with those,  but also another 3 yards of fabric.

Great holiday basket found at THE GRAPHICS FAIRY
 
 I decided I needed to get into the season so I created 2 Christmas holiday aprons.  One uses an image a GRAPHICS FAIRY image and the other one employs the crazy red and green dot fabric I picked up.

Francine is wearing her Christmas choker!
This departs from my usual method. The fabric applique is machine sewn with a zig-zag stitch.
The large and small wreath use a wider looser stitch while the Christmas ornaments and their string are sewn with a narrower and tighter zig-zag.

November 24, 2012

The Paris Bathroom

When we had this house built 11 years ago, it was the first time I had a home with a guest bathroom. It is the usual tiny space but I wanted it to be fun. I could be more creative in this small room without hubby being concerned that it was "too much".

And TOO MUCH was just what I was aiming for.  I wanted to see just how much trip acquired and just Paris inspired could be tastefully crammed into a small room. It will not be considered complete until stuff reaches the ceiling.


The first to grace the wall was this collage (the bottom one) that I made from scaps of memorabilia from my very first trip to Paris in 1989. The collage on the top was an ebay purchase. If it was today, I would have made my own.


The poster and the metal tray were also ebay acquired. If I had only known in 1989, I would have bought more stuff then, but I had no idea we would ever consider a new house at that time.

The arrangement on this wall is probably my least favorite. It lacks the personal attachment but it has "the look".


The newest additions are my proudest because I created them with the help of the fabulous images from The Graphics Fairy. The fan image is transferred to Osnaburg fabric stretched on a wooden embroidery hoop and hung with a ribbon.


Numerous Frenchy labels and a postcard image adorn the potty lid cover made of simple unbleached muslin.  Yes, it washes quite nicely!


Graphics Fairy images were added to three decorative hand towels I found for $2 each in an antique shop. Even the tissue box has Graphics Fairy images on all four sides. They were added after I painted the box with Annie Sloan chalk paint.  The little tip plate says "Merci" and has some old European coins in it.  I really need to find some old French francs.


Here is a wider view showing the little impressionist painting (just above the towels) actually purchased in Paris near Sacre Coeur pictured in the print above it. There is a repeat of 3 more plates on the other side of the collages just out of view. The ones in the racks are Paris scenes and two others are "fashion plates".
Someday I want to get brave enough to do some sort of paint technique below the balloon border.


November 19, 2012

Meet Francine


My hubby and the grandkids have all been models for me on this blog but I needed a really attractive woman to display my lady-like stuff. I found her last week on Amazon.com and she didn't demand a high price. As soon as she came out of her box I knew her name was Francine. Don't ask why. She just IS Francine.

I'm slowly transforming my kitchen into a somewhat Provencal style and that room has the best light and available picture taking spots, so I set her up there in an apron made of fabric from France. I have traveled there but didn't have the forethought in 2010 to bring back a lifetime supply of this hard to get fabric. I have found a great online  source in Cincinnati called French Rendez-vous .


The fabric picture here just arrived a few days ago and it is a coated fabric that wipes clean but is not nearly so heavy and glossy as an oil cloth. I plan to make placemats with it.
 
My weekly bow to the Graphics Fairy is the pillow shown sitting on my French farmhouse-like chair. It is made from an old damask tablecloth and Battenburg style lace adorned by the great hydrangea image. The back is made from a fat quarter of the perfect hydrangea print.


November 11, 2012

Bits and Pieces


Anyone who sews, quilts and crafts knows that you can never have enough fabric. When I have lots of yardage hanging around I am inspired to combine them in interesting ways but if I have to know exactly what I need to go and purchase , "creative block" sets in.

Pillows are one of the items I've been working on and the thin cottons that I use in my aprons is too wimpy.  The home decor fabric is nicer but alas, also more pricey.  Recently I discovered discontinued samples and remnants. They are small but force you to combine pieces in interesting ways.
 
I am going to attempt my first tutorial about how I have transformed these small pieces into a pretty nice pillow. The largest pieces are usually no more than 16" x 16" so if I keep my seams narrow I can use a 16" x 16" pillow insert. TIP:  The insert fills out the pillow much better if you don't allow ANY extra room. More on the insert later. I selected a blue/tan pattern for a base and just placed two tan blocks on top of it. But, before actually sewing down the pieces I added a tree graphic from the good old reliable Graphics Fairy.

 I'm not super techy and I just insert my graphics onto a word document. I always create a text box first and then insert the graphic. This gives me extra room for others to fit. If you don't want the text box to be seen you can make it go away by selecting NO LINE for the box. I try to use as much of the space as possible before I print onto Lesley Riley's Transfer Artist Paper. This is more costly than other papers I tried but well worth it. It is so easy to use and doesn't leave a plasticky surface.
After printing, cut as much of the unnecessary paper away from the graphic as possible. Always remember that you will  get a reverse image. So  if you have text or the design will be affected,  ALWAYS flip the image before printing. I have done this a number of times and completely wasted a sheet of transfer paper. (I have even been so stupid as to iron it onto the fabric thereby wasting the fabric as well.)
 Lesley's TAP paper is so easy to use. Just have a good hot dry iron and remove the paper while it is HOT. Slowly peel it back and if it doesn't pull away just give a little more heat. Here is my image below. The other block was created by enlarging a section of the same Graphics Fairy image.
The squares needed a little more so I added some stitching for a little "boost". A FRIXION pen is great to give you a guide for stitching because after you have finished you can erase it with an iron or even a hair dryer!
Now stitch the whole top to the backing fabric which is another nice co-ordinating dark blue 16x16 sample. I used the Frixion pen again to draw my seam line because I want to get the corners rounded nicely. I found that if I square the pillow off too sharply the corners don't get filled with the insert and look like little "ears".
After trimming the corner excess, flip the pillow cover to the right sides and shove in the insert. I don't leave the opening any wider than absolutely necessary since I have to stitch this up by hand for the neatest appearance. The pic below may look weird. In order to ease the work of pushing the insert into the cover try slipping it into a plastic bag. It makes it slippery. After getting it inside just pull and tear the bag to get it out from around the insert. My mother taught me this trick when upholstering cushions. (Thanks, Mom.)
Stitch up the opening by hand and VOILA! When I have more fabric for the backing I prefer to make an envelope closure on the back so you can slip the insert in and out whenever you like and eliminate the hand sewing. For a tutorial click to go to CONFESSIONS OF A PLATE ADDICT's blog who is an inspiration for me to try this blogging thing.


November 4, 2012

Craft Show Fail

This is the way it looked all day...no people!


Yesterday was my first real craft show and it was a bust. I got late notification and so I spent the whole month of October preparing. Not knowing what to expect, I tried to have something to please a variety of tastes so I would know the best way to go in the future. 

Little did I know that the late notification I got extended to the public who had no notification and a show that had previously drawn a large crowd had barely a trickle of attendance.  Others who have done this show before said booths were fewer and most of us bought from each other.  Luckily a table was only $30 so I made that back plus $10 but I  spent more than the $10 to help out others.  I am not in this to make a lot. I basically need to recoup some costs of materials but...

Maybe Etsy?

Well, here are a couple items for the guys. Hubby is modeling while pretending to cook. All of these sport images gleaned from the fabulous Graphics Fairy.


October 29, 2012

Something for the Kiddies


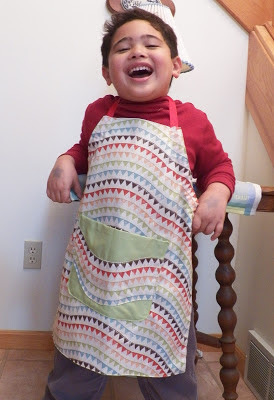
Not much got done this weekend while we baby-sat the grandkids so having them model for the blog seemed a great idea. "Seemed"  is the word since getting one them to stand still for a nano-second in the case of the little on (18 mos.) or to stop making ridiculous poses for the 5 year-old was near impossible. Of course it WAS silly to have him pose in an apron made for a girl. But he was just the right size.  Unfortunately, my sweet girl is pretty much swamped by the apron I put on her.
 
Hard to see but the words around the little flower read "Ring around the rosy, Pocketful of Posy". The image is from The Graphics Fairy.
 
She loved this one with the fabric flowers. She laughed every time she touched them.
Above and below are the two sides of a reversible apron. The bouncing ball is a big red button.

 
Spiffy, huh?