Showing posts with label zippers. Show all posts

October 18, 2016

The Blog Revival - Zipper Bags without a Zipper Foot


HELLO? Is anyone still there?  I abandoned this blog back in January with a 2015 wrap-up and then was not inspired to carry on. BUT, today I decided the give it another chance as I was stitching up some samples for my Etsy shop.  After making several hundred of these bags, I have developed a few tricks. Maybe I'm not the first to do these but I didn't see them anywhere else.

#1. No Zipper Foot Required


In this photo you can see that I am attaching the nylon coil zipper with the regular foot that came attached to the machine (Janome Memory Craft 9900). The foot is about 3/4 inch wide and clear plastic. Yours may be different but should still work. I lay the zipper down and simply stitch on that slightly raised line that appears on most zippers. I only use YKK.


Here I am attaching the other side of the zipper to the other side of the zipper bag.

Helpful Hint: Always start with the zipper halfway open and when you get to the zipper pull STOP, raise the presser foot and move the pull to the back and away from your stitching line.

This is the outside of the bag. Now attach the lining pieces on the other side of the zipper.


 My exterior pieces have been lined with a fusible batting and pre-quilted.  The lining piece is underneath and I stitch over the line I created when I sewed on the exterior fabric. I find this much easier than trying to align the two fabrics and the zipper all together.

AGAINAlways start with the zipper halfway open.

 Here is the lining AFTER I had opened it out and stitched lining the  edge of presser foot up with the nylon coil.  I only stitch through the lining fabric and the edge of the zipper. I do not stitch through the exterior fabric. This helps hold the lining fabric out of the way of the zipper.

#2. Use Grosgrain Ribbon for the Zipper Tabs

I really like the method of creating tabs on the ends of the zippers, but find it fidgety to cut little pieces of fabric and fold them to create a tab. I use 7/8 inch wide grosgrain ribbon which I have lots of since I use it on my jewelry rolls.  

Stitch a two inch piece of ribbon at each end of the zipper lining up with the exact length you want. I make my zippers 1 inch shorter than the top edge of the fabric I am using.

I know these photos are bad but didn't see that until it was too late. The zippers shown are the peach color used in the bag. I have no idea why they show up as PINK!!


Unfortunately, this photo is blurry but should still show how I fold and press each end to create the tab. I DO NOT stitch over this as the ribbon will be held in place when it is sewn into the bag.

Open that zipper halfway !!!
before this step.  With the right sides to right sides sew all around the perimeter of the exterior and interior fabrics leaving an opening in the bottom of the lining fabric.

Another Hint:
I sew a slightly larger seam allowance on the lining fabric than the exterior fabric because when it is turned and put inside the lining has a tendency to feel too big.
 When sewing over the transition from the exterior to the interior try to go just up to the edge, but not over that ribbon tab that you made.

 A boxed bottom is created with those corner cuts I use.  Simply open them out and match the seams up and stitch across. Again, I make the interior seams a bit wider than the exterior ones. And here is how they look from the top. A bit of ribbon through the zipper tab makes them look less naked.
So, let me know if this helps you in any way. If you don't care because you don't sew you can visit these bags and more at CherylThimbleFingers on Etsy.


March 29, 2015

Sewing for Me with Katherine Tilton and Vogue

 I have a number of fabric purchases that have been awaiting their turn to be transformed into SOMETHING but this project took precedence and got done. I attended the Cleveland Quilting and Sewing EXPO this week and for such occasions you MUST wear something hand made. I did so for one of the two days I spent there and here it is.
The fabric is a reversible knit in dots and stripes AGAIN. I made something with reversible knit previously (see here). 
The pattern is Vogue 8793 by Katherine Tilton and I chose it for the bit of quirkiness and the zipper detail on the double collar. The knit I chose is probably a bit stretchier than the Moderate Stretch Knit Only which is suggested. The stretchiness might be why the sleeve on the right in this photo is so much longer than the left. A tug would have evened them up but didn't see it until I put it up here.

An advantage of the extra stretch is that the sleeves are a bit tighter than I would like,  but the give makes it tolerable.

Here it is on me. Ooooh, I wish I matched this mannequin. She is a display piece NOT my dress form. 
This collar was the main reason to purchase this pattern (ON SALE) because all Vogue patterns are ridiculously priced (SEE HERE) The printed price on this one is $30. I got it online somewhere for $6, I think.
Again, I ignored instructions and bought a metal zipper, which is definitely what is shown on the pattern picture. 

Adding that double collar was the trickiest because the collar had a wad of layers and they are being sewn onto one rather thin and stretchy shirt layer. I did it on the regular machine with a stretch stitch and then trimmed it up on the serger. A row of top-stitching along that collar seam would have been nice, but I know I would have messed it up. It would have needed an interfacing to handle it and one more layer in that collar seam would have been asking for disaster.

It called for a Lightweight Molded Separating Zipper.  That would be plastic. I wanted this to have the effect of funky jewelry and plastic would just look stupid.  Granted, it would probably work out better in the laundry. This will be hand-washed, dried flat as I can imagine those little metal teeth biting into the soft knit.

Most of the shirt was assembled on the serger. Here I, once more, defy instructions and add the cuff BEFORE sewing up the sleeve seams. The pattern did show sewing the sleeve and side seams after the shoulder seam as in most knits.                                                                                
Again, I wish I was built like this mannequin. But even with Francine's nice straight shoulders you can see a glitch and a bit of stripe misalignment. My remedy for this is to just keep moving and no one will notice. 
Even after adjusting the shoulder width and using tape on the seam, I still get a droop. This pose is also not helping. Hubby was drafted into taking these and he worries way more about the edges of the picture and ignores how to make me look my best.

For your viewing pleasure, here is the left and right sides on Francine. I wish I had mixed it up a bit more on the inner and outer sides of the collars. This pattern would give you a way to mix and match a bunch of leftover knits. I would just make sure to pre-wash and make sure they are equally stretchy.                                                                                                     
Watch for the next installment of ThimbleFingers where I will show you what I acquired at the sewing expo that may change my life!


November 24, 2014

Zippity-Doo-Dah

This week is all about zippers. Some of it is work and some of it is just play.

First the work of shortening a metal zipper.  These things look cool but are a potential disaster for your sewing machine needles.  I buy my zippers before I even know what I am going to use them for so I have quite a messy lot of them.  One time I bought a bag of 50 random zippers for $7.00.

I tend to buy longer ones so they can be used in more applications so many of them get amputated.  The nylon coils are no big whoop. Just don't use your best fabric scissors.

BUT, the metal are a  b@$%& !

I searched online for the best way to do this and came away even more frustrated. I found THIS.

It seemed reasonable, but when I tried to "twist" the tiny little teeth loose with my needle nose pliers absolutely NOTHING resulted.  Now I'm not saying this isn't possible. Its just not possible for ME.

So here is my lame solution which I do not consider a tutorial, Im just saying'.


Using non-fabric scissors,  carefully cut between the teeth to shorten up the zipper and then trim off the teeth
Then I stitched across the fabric tabs to keep them in line


Next I made a tab over the end as I usually do.

And repeated at the other end
 AND THEN, I discovered the problem with this method.  Because the tab didn't completely cover the end of the teeth, the tab could come off the teeth!!!  So, I hand stitched my own version of a stop by sewing this :  Yes, it looks messy. But is basically hidden later.  JUST SEW VERY SLOWLY when you get to the teeth and you can maneuver through them.

However, I did manage to get both tabs on the end and got the zipper to work in the little bag I was making.

         Now for play time
My 3 1/2 year old grand daughter in the sewing/computer/play room
 I told you I have lots of zippers and more are on the way from my favorite supplier ZIPIT on Etsy.
 That open drawer contains a tangle of zippers and Mom's old button box. I gave up on keeping them in some sort of order.

Just throw them out on the floor and hunt for the color.


 She measured them.
 She tested them.
And then we played THIMBLEFINGERS!


I have a bag of not-collection-worthy thimbles in a zip-lock bag which she was allowed to unzip and sort, stack and wear. (I have over 400 in my collection - see previous post HERE. )


Seven-year-old grandson is occupying that black
desk chair in the background damaging his eyesight playing computer games.

I'm thinking she should be my LOGO. 

Do the kids you know find your sewing supplies fun?  What are their favorites?  Hopefully not your rotary cutter!

Love to hear from you but I do moderate my comments before they appear.

September 28, 2014

My Perfect Travel Tote

Just in time for an impending trip to Sicily, Southern Italy and Rome I completed the just for me traveling companion. Well, hubby is going too but since he is old news (literally) I am only presenting the self-sewn creation.
As you can see, this is a 3 piece set.  After completing the tote I was so happy with the fabric I just had to use some more.  The main fabric is a heavy outdoor fabric but it doesn't have that slick surface some of it has.  The straps are a cotton webbing and the exterior pockets on each side are trimmed with black and gray grosgrain ribbon.  Without the black and gray lines this fabric was a little dizzying to look at.  The lining fabric is one I used on some of my mid-century modern pillows (see here). Its a quilting cotton in gray with silvery dots that give it a cool shimmer. I wanted a light interior so stuff wouldn't hide in the dark.

The tote begins with the inside which I wanted fitted out in a certain way.  I had another bag that went to New York with me in May but it was too small and too deep. Stuff just sifted to the bottom and the one zippered pocket was sometimes difficult to get into.


 I cut a  piece of the exterior fabric large enough to surround the zipper on all sides. A little interfacing keeps it more rigid when operating the zipper.


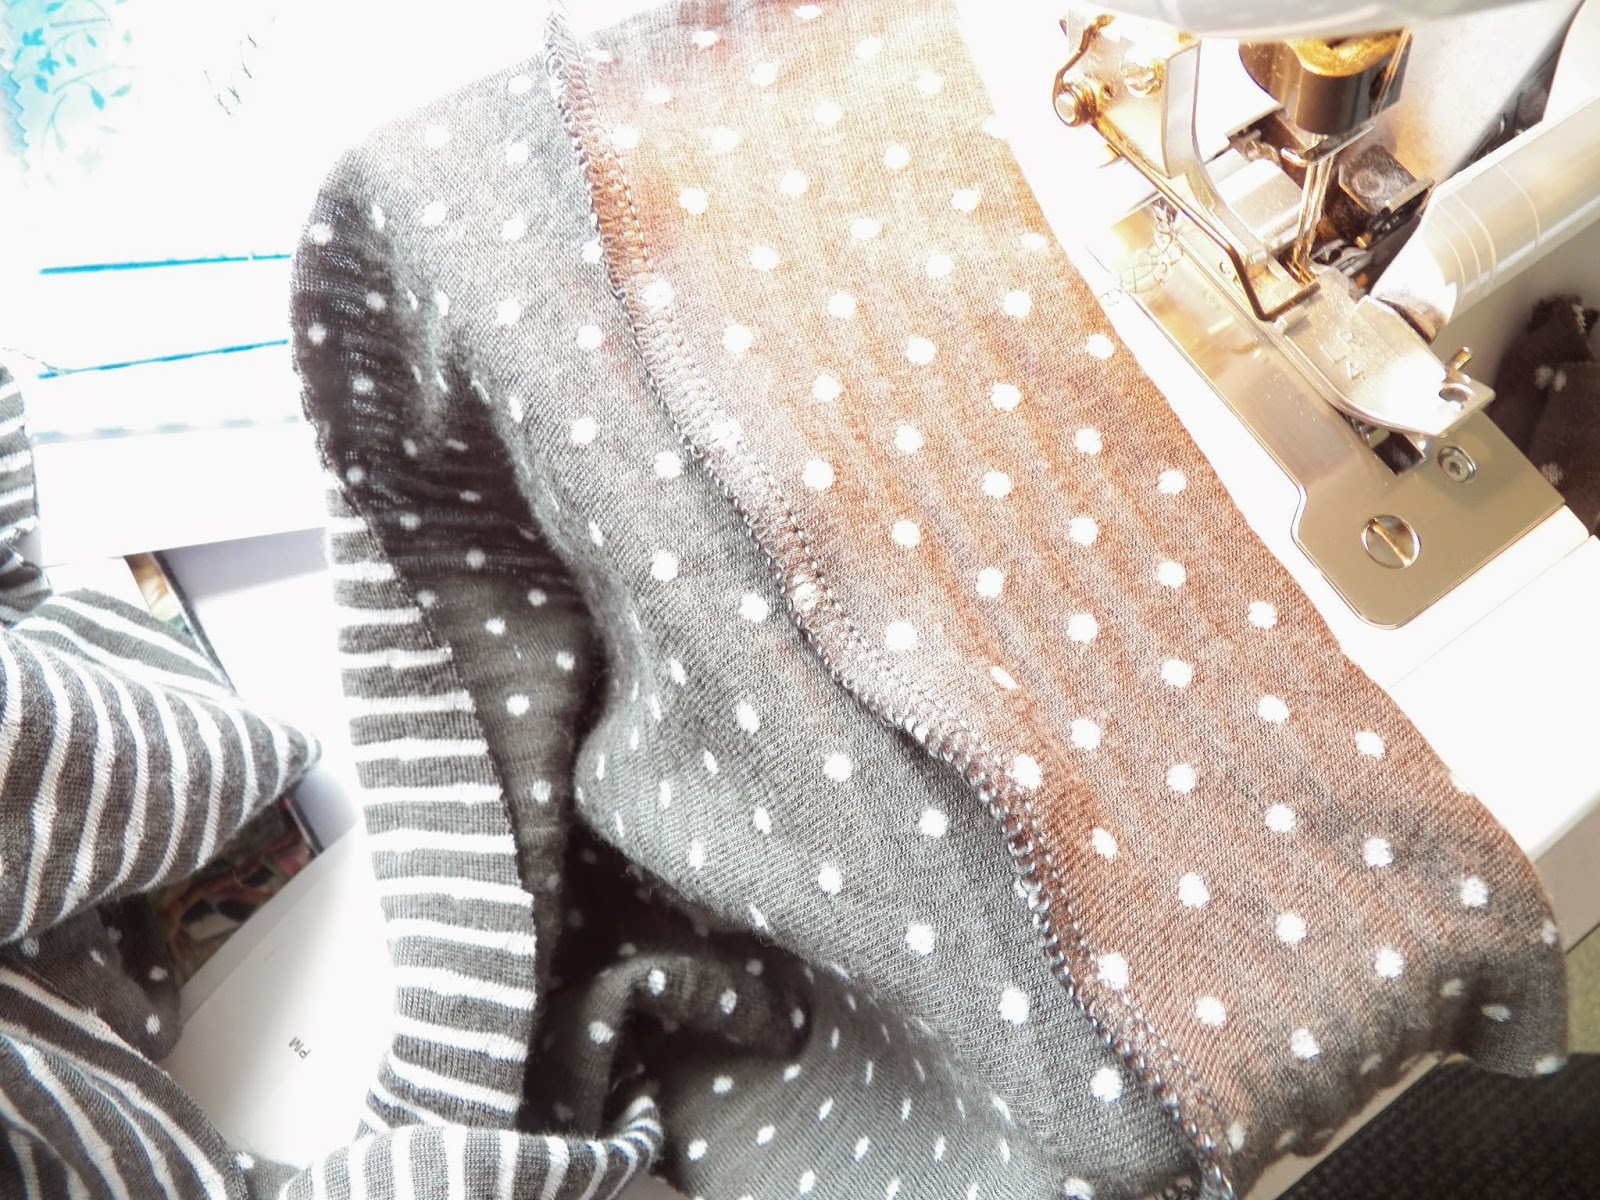
The pocket is one piece of fabric with one side
attached to the bottom of the inside zipper edge and the other end folded over and then sewn to the top edge.
Then you sew up the sides of the pocket folding back at the zipper to catch that little triangle pice.


                                            Here is the placketed zipper completed. The inside is the same fabric.

The other side of the lining is fitted out with a special pocket just for my ever-present iPad.


Its  pretty straight forward pocket lined with the dotty fabric but I added a flap sewn above it to prevent the slippery little iPad from sliding out if the bag gets on it's side.  A bit of Velcro would have been nice but I didn't have any on hand.


 Now I was getting ready to assemble it when I realized that the exterior was limp as a noodle so I decided to add some fusible batting and quilt it. Since I had already sewn on the pockets and webbing to each side I had to work around them.


This is a free-wheeling wavy line I like to do.  No, it is not done free-motion. I am a complete dud at that and am not up to practicing and wasting time, thread and fabric.  I can echo shapes pretty well too.
 Here I used straight lines  following around the rectangle above the pockets.


Here is the back and you can see what I did.  It did give it more heft without weight or stiffness.
I don't back this with anything because the lining will hide it and more fabric would just make the seams bulkier.


 I also added a strip of batting inside the straps because I have learned that they are easier on the shoulders if I do.  I folded the fabric around it and stitched the webbing over the opening.  I like the effect of the little edge of print showing.


 I Hate "saggy bottoms" so I add some stiffener to the boxed bottom of the bag. This is plastic canvas which can be cut with scissors.  Its cheap and does a great job. I always cut against a smooth edge to eliminate any pokey parts. You can see them on the right.

I wrap the plastic in muslin and sew it in place. Goes through the machine fine. I attach it at each boxed end and then trim off the triangle.


Here are two other things I added.  This is a loop of wide black elastic sewn into the side seam on the inside.  Whatever for you ask! It's my upholder.  I can slip my covered cup in there and it stays relatively upright and in place.  I wouldn't trust it for a full steaming hot cup of coffee, but it keeps it from drifting to the bottom.


The little organizer bag has a D-ring on the side which attaches to a clip on a ribbon that is sewn into the side seam.  Its so easy (at least for me) when traveling and juggling your belongings to misplace something so this is my security.


The little wallet, shown open here may or may not go along this time.  When traveling in Italy, pick-pockets are ever-present so I will probably have my passport, cards, and most cash in one of those ubiquitous body wallets under my clothes or better yet, under hubby's.


So here it is packed with one of my essentials for an overnight flight.  That red thing is a knitted shawl that cam wrap me up or serve as pillow or armrest or even throw over my head to escape whatever is bugging me.


Ready to go on board.  Francine is modeling the last clothing item I made for the trip.  Without the folds, this fabric makes you dizzy.  I think it looks best under a black jacket. The bottom edge is served and I tuck it up, or in to create whatever length I need.

                I will not be posting while away but will return with entries to both of my blogs after October 15. I would love to hear comments but get them in before Oct. 2nd.  I screen my comments and that may be difficult while traveling.