January 26, 2014

Winter Sewing Slowdown

I don't know if I can blame it on the extremely cold winter we are having or just lack of imagination, but I have not been turning out much in the sewing department. Since sewing is my escape from cooking and cleaning you might think I would have been busy whipping up magnificent dishes or deep-cleaning the bathrooms. WRONG. Time is just slipping away and I have very little to show for it. 
Except this:


 What is it?
I saw this on my wanderings through Pinterest.


 I clicked on it hoping to find a pattern or a tutorial but it only led to where I could buy it. It looked pretty simple so I set out to DIY. I only needed about a 1/2 yard of fabric and thought the car print was perfect for my grandson. I found another print for grand-daughter but then realized this cannot work for a child in a car seat with the chest straps and buckles. I'll save it until she is out of a car seat which may be ten years since she is so tiny!

I wish I had thought to document the entire process but this will have to suffice. I dragged out some foam rubber scraps and cut them into strips about 18" long. I made one 4 inches wide and the other 2 inches wide and stacked them to create a sort of mound. I wrapped the "mound" with some quilt batting to smooth it out. I did not use the fuzzy backing shown in the picture above. 

I made a tube of the fabric with a flap attached to the side seam. Leave the ends open. The hard part is getting that inner stuff into the outer cover. To facilitate this, put the stuffing into a plastic grocery bag and shove and pull it through. The plastic will help it glide. Fold over the ends and sew across. 


My lack of foresight required that I attach the Velcro by hand since the tube was already made. Duh!
This flap now folds around the back of the seat belt and attaches easily. All of the padding is away from the child's body so that is serves as a cozy pillow but doesn't interfere with the fit of the belt.


The road test proved successful. He likes it and it went home in Dad's car. Note the bear's trousers. These were made when Teddy got left behind at Grandma's house and he requested that I make an outfit. I made sleep shorts for both child and bear that match although child did not get the neck bow.

I find all sorts of great things to make for girls but not so many for boys and at 6 1/2 he is becoming more conscious of appearing "girly". Although I think those florescent pants might lean that way or are they just gaudy?

January 1, 2014

ADSD - Attention Deficit Sewing Disorder

I have a diagnosis. Not officially but through years of self-study and dawning realization the verdict is in. I "suffer" from ADSD - Attention Deficit Sewing Disorder.

Disorder is always part of sewing:


But the inside of my head is sometimes in disarray. I start one project and then jump to another. I home in on one style and suddenly switch to another. 

Sweet and old-fashioned
to contemporary
to "antiqued".  From pillows to aprons in retro style
to who knows what style.
Then it was bags. Zippered pouches:


with faux leather
with birds and quilting 


Zippered wallets

Novelty bags with snap closure and texture

Beach bag

Travel tote
And we can't leave out the wine bags.

Which inspired the wine aprons
And then came towels.


 I even veered off into technology and whipped up a semi-successful iPad cover!
Maybe 2014 will bring new inspiration for entirely new sewing projects. I may actually try tackling clothing for me again although I really dislike thew results I have achieved in the past.


December 27, 2013

Sewing with the Ancestors

For the last few months I have been spending a lot of time with musty old photos and ancestry websites creating family trees and memories. 
TIP: To help out all future generations put names on your photos, both digital and print. I have piles of unidentified people and at my advanced age I have no elder around to give me any hint about them. I didn't even know the pictures existed until quite recently. 

 This is a quilt made by my great-grandmother, probably around 1900. It was said that she purchased the fabric especially for the quilt instead of using the usual fabric scraps and old clothing that was a common source at the time. This was her masterpiece.
Although I would have to say that the color choices would never have been mine, it is quite effective.


This is my great-grandmother on my mother's side of the family. They seemed to be the quilters in my ancestry although since I didn't know my Dad's side so well, they too were probably wielding the needle, too. It was pretty much expected that girls would sew. My grandmother on my Dad's side is the source of my favorite heirloom. See it in this previous post.

Great- Granny must have made a small error in calculation when buying her fabric because there are a few pieces that are not the same shade of green. I wonder if she agonized over it or subscribed to the Amish theory that only God could create perfection and so they always left something amiss. She was German-Catholic so I suspect her attitude was a bit stricter. But, I never knew her and it is only approaching my seventh decade that I have become curious about these people that preceded me.


Years ago I was really into quilting when I did it all by hand like this quilt. However, I never completed a full size quilt. ADHD, I suspect.

My hand quilting was never the quality of this. My grandmother could stitch with the best. Her mother must have taught her. Her quilts were all kit quilts, however and I don't have a single one of them. They were used and washed and worn out and not kept as well as this one.

Grandma Lizzie


This quilt has never been washed as far as I know. It has a few dark spots on it, but in great shape for being over 100 years old. In all of the books on quilting and patterns I have seen over the years I have never encountered this same motif. I guess you would call it a pineapple. I tried to duplicate it once and it was a complete failure.


Has anyone ever seen this design  before? Please comment and let me know.

Just for fun, I am adding a few of these great old photos I found. These are well-dressed unidentified ladies.


December 15, 2013

Fabric as Toys

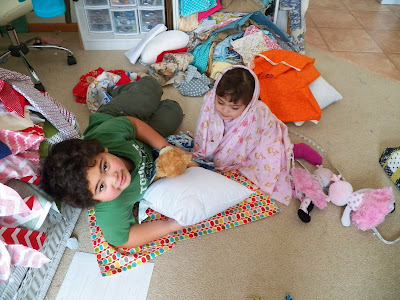
Who needs a trip to the big box store at Christmas when you could just provide the kids with your fabric stash.
 The sewing/computer room became the playroom this morning. 

 I wasn't even going to write a blog post today but thought this irresistible.
Below are all the leftover hexagons from a recent project that were turned into confetti.
It's so cute when they play together...nicely. This did not deteriorate into a "It's mine!" from her.
I know, this room is a mess, but then so am I. They can play in it and it doesn't look any worse than it did before.
Yes, she is wearing the outfit I posted about previously but this time she did not try to take it off. Yeah! 


They are 6 and 2 years old. How long before I can have them sewing? She has already mastered cutting her hair (only a small strand) with blunt kiddie scissors. Luckily she has lots to spare.

December 6, 2013

Stitching by Hand


I have been remiss in my pledge to post EVERY week so I am posting before my usual Sunday this time. I have no excuses other than the lack of ideas and projects.

I spent way too much time on this pillow. I noticed a resurgence of interest in paper piecing and had done it years ago back when I actually taught some quilting classes locally. Everything was by hand then. An organization I was in produced a full size quilt to raffle out of these little hexies.
It worked well for the group as everyone could learn the process quickly. It  didn't require exceptional sewing skills. Everyone could work at home and then we could assemble them. It was all in the typical 70's shades of brown and oranges, as I recall.

I had made a few other pillows for my Etsy shop using some of the rare reds and greens in my fabric stash. I prefer this acid green and red to the more traditional Christmas green. With absolutely no plan in mind for how these would be arranged, I began cutting out paper hexies and hand basting them into the fabric hexes. If you have never done it this tutorial is very good. Mine were not nearly as neatly sewn. I just baste through the paper and tear out the stitches later.

I sewed and sewed and sewed these little buggers and my hand got achy from it. THAT never happened back in the 70's!  I would lay them out just to see how much yardage I had created and was dismayed by the measly supply. 

I had great visions of a fabulous never before seen pattern of amazement like this:
Or this:


Alas, not even close and I was only aiming for pillow size. I have 43 hexagons in this tree and I am tired, tired, tired of sewing them and looking at them and the result is questionable. I did put it on my Etsy shop, though. Why not? Maybe someone out there will love it and give it a good home.


Whether you sell your sewing or not, do you think that you should love everything you make before you offer it at a price to someone else? Please comment.

November 24, 2013

It's the Little Things

Due to extreme distractions and also lack of anything in particular to blog about, I skipped last week's   
entry.  Grandchildren overnight can be great fun and great exhaustion for us older folks.
                                                                  
 Here they are in a rare moment of relative quiet. 

Yes, I know! You really don't want to hear about someone else's grandchildren BUT this really is pertinent to the requisite theme of SEWING. See the pants on grand-daughter? I made them... from a t-shirt that had been hanging unworn in my closest. These are so easy to whip up on the serger.
I bought the shirt she is wearing as I didn't have any fabric to go with the print.

They think the fabric stash is a great place to come up with improvised costumes. This was an especially popular bit of yardage.


Another pair of stretchy little pants! They are not hemmed and the waist band isn't finished yet in wait for this week when I can make sure they fit. WHY don't I write down the measurements is what you are thinking. Well, I was NOT thinking.


Funny thing with this fabric. The monkey faces and the teeny hearts run in both directions. But when I cut and sewed them I found all the monkeys on the from are right side up.
And all the monkeys on the back are upside down.


Haven't decided about a top for these. If I use the same fabric they will definitely look like and BE pajamas.


Yesterday I got really fired up and decided to use a crazy flannel fabric I had ordered online from
Jo-ann Fabrics. The selection in our store was pretty lame and I found some cute ones on their online store.

I like its cozy crazy quality. I am not the biggest fan of the endless pink and purple for little girls as well as all the bows and tu-tus. This is my idea of childhood. With her dark hair and eyes, my Angela can really "carry this off" as they say in the fashion world.
Because I was in the mood to do it immediately and had no pattern I went online and found a pattern On Craftsy I could download which I have never done before. I found THIS :

Here is my fabric cut and laid out. I used the same fabric turned vertical for the bib insert and used 
turquoise rick-rack instead of the ruffle.

Things were going really well and I was whistling away and thrilled to turn this out so quickly.
THEN the old nemesis, the button-hole came up to bite me!. I have never used the button hole foot that came with my new Janome and I decided now would be the time to use it. I made several practice button holes on scraps of the same fabric and it worked great, but when I tried to do it on the garment the seams somehow fought with the button foot and it stuck. I even spent waaaay too much time trying to remove one and then the next attempt got totally misplaced because what I thought was my start mark WASN"T.  Here is my solution. I used snaps ignoring the ill-advised buttonholes.


And then I covered up the whole mess with some of this giant size jumbo rick-rack I bought back when I had no idea what I would ever use it for. 
Then I cut an interfacing for the hem and added the same rick-rack as a finish for the hem to repeat it for balance. Since my model will not be here for awhile and is has been typically two when I want to photograph her (see previous entry ) , I am using a bulletin board for display. You will see I have cut up another orange t-shirt for a coordinating pant. I had that bit of green from a previous remake. So overall this went really well except for those little button hole things!!